Introduction
'builds' globally consist of several steps (details can differ among different customers)
- selecting what to build. this can be based for example on a tag or status/property of a source in a version control system or a selection of tasks with a specific status (if issue management and version control are linked).
- preparing a workarea / workspace based on the above
- triggering a build (manually or automated by monitoring a version control system)
- archiving the build ('releasing')
This post will have a limited scope since putting the above into place is customer specific and requires some time (a project) to achieve a production ready setup. I will manually trigger a build for a prepared workarea. This can of course be expanded. I've chosen to call Ant from Jenkins. The following post describes how Maven can be used to wrap Ant; http://redstack.wordpress.com/2011/03/15/getting-started-with-continuous-integration-for-soa-projects/. Ant wraps Java classes to achieve deployment. Jenkins has plug-ins to directly call Ant tasks and has easy integration in the GUI (Ant output parsing). I do not see the added benefit of wrapping Ant in Maven.
I've installed Jenkins as described on; https://wiki.jenkins-ci.org/display/JENKINS/Installing+Jenkins+on+Ubuntu
I've chosen for Jenkins instead of Hudson based on http://stackoverflow.com/questions/4973981/how-to-choose-between-hudson-and-jenkins.
The Buildserver installed is an Ubuntu 12.04 server 64 bit installation.
Implementation
I've adapted the scripts used in my previous buildtool post slightly for this purpose. I've used a JDeveloper installation instead of 'manually' copying JAR files. This has the benefit that JDeveloper can easily be upgraded and plugins can more easily be installed using the GUI. This provides a more steady and flexible base for the buildtool then manually copying JAR files.
MDS and adf-config.xml
Also for the purpose of MDS dependencies I've expanded the build.xml file to write an application specific adf-config.xml and copy it to the relevant application directory. The adf-config is copied to the application directory and it contains placeholders; MDS_REPOSITORY and MDS_APPLICATION. These are replaced in the build.xml using;
Copy to application
<mkdir dir="${proj.compositeDir}/${proj.compositeName}/SCA-INF/classes/META-INF"/>
<copy file="${base.dir}/adf-config.xml" tofile="${proj.compositeDir}/${proj.compositeName}/SCA-INF/classes/META-INF/adf-config.xml"/>
Replace placeholders
<replace file="${proj.compositeDir}/${proj.compositeName}/SCA-INF/classes/META-INF/adf-config.xml" token="MDS_REPOSITORY" value="${mds.repository}"/>
<replace file="${proj.compositeDir}/${proj.compositeName}/SCA-INF/classes/META-INF/adf-config.xml" token="MDS_APPLICATION" value="${mds.application}"/>
Buildtool setup
I've installed JDeveloper in /home/oracle/Middleware11116. I've used the standard installer. I did however encounter the following problem when I tried to call the 32 bit JDeveloper installer on a 64 bit OS; http://stackoverflow.com/questions/2716702/no-such-file-or-directory-error-when-executing-a-binary
I've created a buildtool directory /home/oracle/Middleware11116buildtool. In this directory I've created a symlink Middleware to /home/oracle/Middleware11116. The directory structure is as followed;
-rw-rw-r-- 1 oracle oracle 1911 Aug 21 09:40 adf-config.xml
drwxrwxr-x 3 oracle oracle 4096 Aug 23 16:40 build-area
-rw-rw-r-- 1 oracle oracle 83 Aug 25 13:06 build.num
-rw-rw-r-- 1 oracle oracle 925 Aug 25 12:59 build.properties
drwxrwxr-x 16 oracle oracle 4096 Aug 25 13:06 builds
-rw-rw-r-- 1 oracle oracle 21961 Aug 25 10:54 build.xml
-rwxrwxr-x 1 oracle oracle 449 Aug 23 13:32 deployAll
-rw-rw-r-- 1 oracle oracle 407 Aug 14 09:05 deployAll.bat
-rw-rw-r-- 1 oracle oracle 261 Aug 5 18:07 dev.jndi.properties
drwxrwxr-x 2 oracle oracle 4096 Aug 23 13:33 junit
drwxrwxr-x 2 oracle oracle 4096 Aug 23 13:16 lib
drwxrwxr-x 2 oracle oracle 4096 Aug 25 13:06 logs
lrwxrwxrwx 1 oracle oracle 28 Aug 23 13:19 Middleware -> /home/oracle/Middleware11116
You can download the scripts here; http://dl.dropbox.com/u/6693935/blog/buildtoolscriptsincmds.zip
Jenkins setup
After the Jenkins installation I've added the Jenkins user to the oracle group (/etc/group) in order to access the buildtool, Ant, JDK, etc. After having started Jenkins, first I've configured the JDK and Ant;

Then I've created a multiconfiguration project
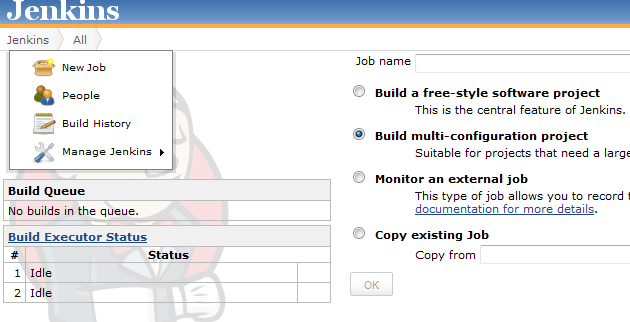
I've done this in order to be able to allow different configurations to be deployed at a later stage. I've not tried this yet though.

Then I've selected the JDK ant Ant version to be used. Important here is;
- specify the base dir in which Ant is executed; base.dir=/home/oracle/Middleware11116buildtool. this makes sure Ant can find the required scripts and of course the build.properties!
- specify the build.xml file; /home/oracle/Middleware11116buildtool/build.xml.
Running
After the task is configured, it can be run. This results in the below

No comments:
Post a Comment